(→Tips) |
(Added image: 3 gbc images) |
||
| (17 intermediate revisions by 4 users not shown) | |||
| Line 1: | Line 1: | ||
| + | {{Infobox track |
||
| − | <div style="float:right;"> |
||
| + | |name=Toys in the Hood 1 |
||
| − | {| border="1" |
||
| + | |image=Nhood1Landscape.png |
||
| − | | colspan="2"| [[File:Nhood1.png|230px]] |
||
| + | |type=Standard Track |
||
| − | |- |
||
| + | |length=735 metres<br>737 metres ([[reversed]]) |
||
| − | | style="width: 20px;"| Folder Name |
||
| + | |cup=Easy |
||
| − | | style="width: 20px;"| nhood1 |
||
| + | |time=00:54:000<br>01:32:000 ([[Re-Volt (PS1)|PS1]]) |
||
| − | |- |
||
| + | |folder=nhood1 |
||
| − | | style="width: 20px;"| Soundtrack |
||
| + | |author=[[Acclaim Studios London]] |
||
| − | | style="width: 20px;"| nhood1.mp3 |
||
| + | |redbook=4 9 |
||
| − | |- |
||
| + | |normal=Available at start |
||
| − | | style="width: 20px;"| Length |
||
| + | |reverse=Beat the Challenge times for [[Easy]] tracks in [[Time Trial]] |
||
| − | | style="width: 20px;"| 735 metres |
||
| + | |mirror=Beat the Challenge times in Reverse |
||
| − | |- |
||
| + | |rm=Beat the Challenge times in Mirror |
||
| − | | style="width: 20px;"| [[Reversed]] Length |
||
| + | |previous=[[Toytanic 2]] |
||
| − | | style="width: 20px;"| 737 metres |
||
| + | |next=[[SuperMarket 2]] |
||
| − | |- |
||
| ⚫ | |||
| − | | style="width: 20px;"| Difficulty/Cup |
||
| ⚫ | |||
| − | | style="width: 20px;"| Easy/Bronze |
||
| − | |- |
||
| − | | style="width: 20px;"| Unlock |
||
| − | | style="width: 20px;"| None |
||
| − | |- |
||
| − | | style="width: 20px;"| [[Time Trial|Challenge Time]] |
||
| − | | style="width: 20px;"| 00:54:000 |
||
| ⚫ | |||
| − | </div> |
||
| + | As the first track in the game, it is easy to navigate through, making it a good place to race on for beginners. |
||
| ⚫ | |||
| − | This track |
+ | This track is included in demos of all the [[Re-Volt|game's ports]], except the [[Demos#Third_type:_Rolling_Demo|Rolling Demo]]. |
| − | == |
+ | == Course Layout == |
| + | Racers start on the edge of the construction site. Ahead is a T-intersection, at which racers will have to turn right. A smooth left bend follows, which leads to an acute right turn. A long straight ensues, before leading to another T-intersection. Here the vehicles will have to turn left. |
||
| ⚫ | There is a basketball at the end of the main straightway that bounces out into the road on the first lap. While not as heavy as a [[Ball Bearing]], it can still spin the car out and |
||
| + | A right turn follows, which then leads to another long straight before another right turn. What follows is a curvy bend; racers have an option to cut corners using the curbs. Following another right turn will lead into a loop, arriving back at the second T-intersection. |
||
| + | There, competitors will drive back to the starting line in reverse, but instead will have to enter the construction pipe that lies on the left side on the first T-intersection. The construction pipe is dark and narrow compared to the rest of the track. The pipe eventually ends, leading to the construction site. Racers must climb the steep ravine back onto the road, which leads back to the starting line, completing the lap. |
||
| − | [[Image:Nhood1GPulse.jpg|thumb|left]] |
||
| − | == Global Pulse Location == |
||
| ⚫ | The [[Global Pulse]] is found above the parked car on the main straightway. There is a ramp leaning against the back of the car; line up and hit it full speed (on a rookie car) to nab it. Higher-rank cars will need to reduce speed near the top, or else they will fly clear over it. The Global Pulse is located on top of the red car with a ramp behind. |
||
| + | === Hazards/Obstacles === |
||
| ⚫ | |||
| ⚫ | There is a basketball at the end of the main straightway that bounces out into the road on the first lap. While not as heavy as a [[Ball Bearing]], it can still spin the car out and cause it to lose speed. There are also some traffic cones scattered around the streets that get in the way when making shortcuts on the corners. The construction pipe is also narrow, which promotes a lot of carnage there. Despite the obstacles, the track is quite clean with almost no interruption in the cars' flow. |
||
| − | == Practice Star Location == |
||
| + | == Strategies == |
||
| ⚫ | |||
| + | The sidewalks are a great way to cut corners. Most of them have inclined entrances, which allows vehicles to drive onto them. However, vehicles will gain a slight amount of air time, which can potentially cause time to be lost in the long run if performed frequently. |
||
| + | There is also a shortcut consisting of a narrow route right after the first long bend, which ends adjacent to the red parked car on the main straightaway. The shortcut however, is ineffective, due to the wide open nature of the track; the speed reached in the shortcut is much lower than the speed reached on the normal route. It is better to take the sidewalk cuts. |
||
| + | As mentioned before, the construction pipe is small and narrow. This makes trap items such as the [[Clone Pick Up]] or [[Oil Slick]] much more effective, so it is advised to place it in this section. Alternatively, placing these items just before or right after the tunnel is a good idea. |
||
| − | == Tips == |
||
| + | |||
| − | * Cut corners as much as possible; most curbs have an incline and you can use to your advantage. |
||
| + | Finally, more powerful and high accelerating cars such as [[Adeon]] or [[SNW 35]] can drive right up above the construction ravine near the end of the track instead of going around it. |
||
| − | * Avoid jumps unless you need to get the [[pick-up]] sitting above it; jumps will slow you down. |
||
| + | ==Star Locations== |
||
| − | * If your car has enough speed coming out of the sewer pipe, you can just speed right up the steep incline instead of taking the usual route. |
||
| + | <tabber>Global Pulse=[[Image:Nhood1Global.png|thumb|250px]] |
||
| − | * Try using [[Oil Slick|oil slicks]], [[Ball Bearing|ball bearings]], and [[Clone Pick Up|clone pick-ups]] in the sewer pipe. |
||
| ⚫ | The [[Global Pulse]] is found above the parked car on the main straightway. There is a ramp leaning against the back of the car; line up and hit it full speed (on a rookie car) to nab it. Higher-rank cars will need to reduce speed near the top, or else they will fly clear over it. The Global Pulse is located on top of the red car with a ramp behind. |
||
| − | * A great place to drop a clone pick-up or oil slick is in the midst of the three pickups that are in front of the starting line; drop one on your way into the sewer pipe (or out of it, if playing the track [[reversed]]). |
||
| + | |||
| − | * The shortcut inside the alleys (entrance before the second corner, in a house with a tree) seems to be longer than driving along the streets. It is not a good option. |
||
| + | In the [[Re-Volt (PS1)|PlayStation version]], the star is not airborne, lying on the top of the car instead. This makes it easier to grab as the vehicles do not have to exit the ramp at a particular speed. |
||
| − | * In some places of the track is possible to make cuts at sidewalks, where the player can trace a diagonal way along it. There're four points in total: the first, third and fifth corners for instance; also climbing the sidewalk under the red parked car near to the end (pictures above). |
||
| + | |||
| − | * With a powerful car ([[Cars|Semi-Pro or Pro cars]]) is possible to climb the construction side ravine and make a shortcut. |
||
| ⚫ | |||
| ⚫ | |||
==Triva== |
==Triva== |
||
| − | *In CGW / PC Gamer [[demos]] and [[dev]], this track doesn't have ramps, and contains more pickups |
+ | *In CGW / PC Gamer [[demos]] and [[dev]], this track doesn't have ramps, and contains more pickups on sidewalks and different [[AI Nodes]]. |
| + | |||
| + | ==Gallery== |
||
| + | <gallery hideaddbutton="true"> |
||
| + | Nhood1.png|Toys in the Hood 1 gfx art. |
||
| + | Rookie_Starpos.png|The starting grid. |
||
| + | Nhood1Layout1.png|The first T-intersection. |
||
| + | Nhood1Layout2.png|The first main road. |
||
| + | Nhood1Layout3.png|The second T-intersection. |
||
| + | Nhood1Layout4.png|The second main road. |
||
| + | Nhood1Layout5.png|Across the bends. |
||
| + | Nhood1Layout7.png|Chaos in the narrow construction pipe. |
||
| + | Nhood1Layout8.png|Climbing out the ravine. |
||
| + | Nhood1Layout6.png|The alternative narrow route. |
||
| + | Gbc nhood1.png|GFX art for the discontinued [[GBC port]]. |
||
| + | Gbc nhood race 2.png|[[RC Bandit]] and [[Sprinter XL]] racing in the GBC version of the track. |
||
| + | Gbc nhood race 1.png|[[RC Bandit]], [[Evil Weasel]] and [[Sprinter XL]] racing in a further section. |
||
| + | </gallery> |
||
==See Also== |
==See Also== |
||
| + | * [[Toys in the Hood 2]] |
||
| − | [[Toytanic 2|← Toytanic 2]] | [[Supermarket 2|Supermarket 2 →]] |
||
| − | [[Category: |
+ | [[Category:Tracks]] |
| − | [[Category: |
+ | [[Category:Standard Tracks]] |
| + | [[Category:Easy Tracks]] |
||
Revision as of 23:50, 21 April 2019
Toys in the Hood 1 is a standard track created by Acclaim Studios. It is the first track in the game. It sets the racers in suburbia, starting at a construction site and taking the players around residential buildings. The racing line and track layout is known to be very open and wide.
As the first track in the game, it is easy to navigate through, making it a good place to race on for beginners. This track is included in demos of all the game's ports, except the Rolling Demo.
Course Layout
Racers start on the edge of the construction site. Ahead is a T-intersection, at which racers will have to turn right. A smooth left bend follows, which leads to an acute right turn. A long straight ensues, before leading to another T-intersection. Here the vehicles will have to turn left.
A right turn follows, which then leads to another long straight before another right turn. What follows is a curvy bend; racers have an option to cut corners using the curbs. Following another right turn will lead into a loop, arriving back at the second T-intersection.
There, competitors will drive back to the starting line in reverse, but instead will have to enter the construction pipe that lies on the left side on the first T-intersection. The construction pipe is dark and narrow compared to the rest of the track. The pipe eventually ends, leading to the construction site. Racers must climb the steep ravine back onto the road, which leads back to the starting line, completing the lap.
Hazards/Obstacles
There is a basketball at the end of the main straightway that bounces out into the road on the first lap. While not as heavy as a Ball Bearing, it can still spin the car out and cause it to lose speed. There are also some traffic cones scattered around the streets that get in the way when making shortcuts on the corners. The construction pipe is also narrow, which promotes a lot of carnage there. Despite the obstacles, the track is quite clean with almost no interruption in the cars' flow.
Strategies
The sidewalks are a great way to cut corners. Most of them have inclined entrances, which allows vehicles to drive onto them. However, vehicles will gain a slight amount of air time, which can potentially cause time to be lost in the long run if performed frequently.
There is also a shortcut consisting of a narrow route right after the first long bend, which ends adjacent to the red parked car on the main straightaway. The shortcut however, is ineffective, due to the wide open nature of the track; the speed reached in the shortcut is much lower than the speed reached on the normal route. It is better to take the sidewalk cuts.
As mentioned before, the construction pipe is small and narrow. This makes trap items such as the Clone Pick Up or Oil Slick much more effective, so it is advised to place it in this section. Alternatively, placing these items just before or right after the tunnel is a good idea.
Finally, more powerful and high accelerating cars such as Adeon or SNW 35 can drive right up above the construction ravine near the end of the track instead of going around it.
Star Locations

The Global Pulse is found above the parked car on the main straightway. There is a ramp leaning against the back of the car; line up and hit it full speed (on a rookie car) to nab it. Higher-rank cars will need to reduce speed near the top, or else they will fly clear over it. The Global Pulse is located on top of the red car with a ramp behind.
In the PlayStation version, the star is not airborne, lying on the top of the car instead. This makes it easier to grab as the vehicles do not have to exit the ramp at a particular speed.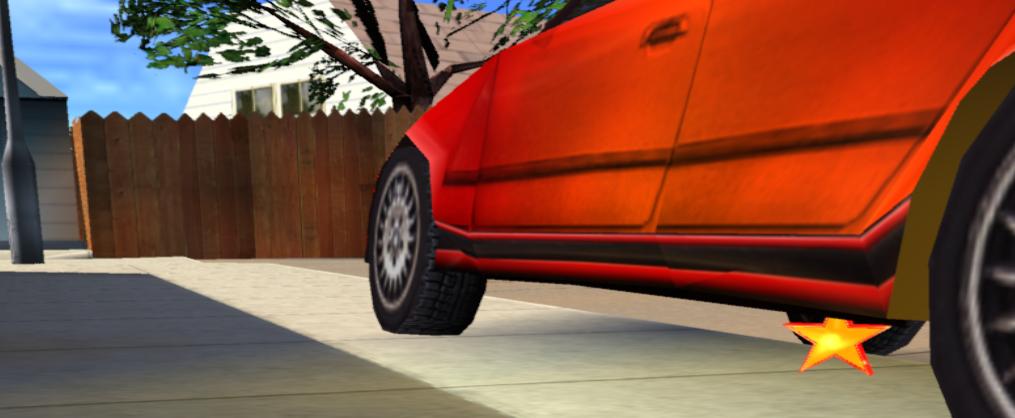
Triva
- In CGW / PC Gamer demos and dev, this track doesn't have ramps, and contains more pickups on sidewalks and different AI Nodes.
Gallery
")
")
")
")
")
")
")
")
")
")
")
")
")