KayTheFalcon (talk | contribs) No edit summary |
(Added image: 2 gbc images) |
||
| (31 intermediate revisions by 5 users not shown) | |||
| Line 1: | Line 1: | ||
| + | {{Infobox track |
||
| − | <div style="float:right;"> |
||
| + | |name=SuperMarket 2 |
||
| − | {| |
||
| + | |image=Market2Landscape.png |
||
| − | |- |
||
| + | |type=Standard Track |
||
| − | ||'''Supermarket 2''' |
||
| + | |length=301 metres<br>299 metres ([[reversed]]) |
||
| − | |- |
||
| + | |cup=Easy |
||
| − | ||[[File:Market2.png|thumb|Supermarket 2]] |
||
| + | |time=00:24:000<br>00:36:000 ([[Re-Volt (PS1)|PS1]]) |
||
| − | |- |
||
| + | |folder=market2 |
||
| − | | |
+ | |author=[[Acclaim Studios London]] |
| − | |- |
||
| + | |redbook=4 9 |
||
| − | || Folder Name: || market2 || |
||
| + | |normal=Available at start |
||
| − | |- |
||
| + | |reverse=Beat the Challenge times for [[Easy]] tracks in [[Time Trial]] |
||
| − | || Soundtrack: || Little Toy Carz.mp3 || |
||
| + | |mirror=Beat the Challenge times in Reverse |
||
| − | |- |
||
| + | |rm=Beat the Challenge times in Mirror |
||
| − | || Length: || 301m || |
||
| + | |previous=[[Toys in the Hood 1]] |
||
| − | |- |
||
| + | |next=[[Museum 2]] |
||
| − | || Difficulty: || Easy || |
||
| + | }} |
||
| − | |- |
||
| + | <b>SuperMarket 2</b> is a [[standard track]] created by [[Acclaim Studios]]. It is the second track in the [[Bronze Cup|Bronze Cup Championship]]. It sets the racers in a small grocery store. In the middle of the track lies the storage freezer, which is the track's most distinctive feature. |
||
| − | || [[Mirrored|Mirrorable?]] || Yes || |
||
| − | |- |
||
| − | || [[Reversed|Reversable?]] || Yes || |
||
| − | |} </div> |
||
| − | '''Supermarket 2''' is a stock track, created by [[Acclaim Studios]]. It sets the racers in a small grocery store, racing down the aisles, checkout lanes, and even the storage freezer. |
||
| + | ==Course Layout== |
||
| ⚫ | |||
| + | Racers start at the entrance of the supermarket. Ahead of them lies three aisles, which open up four lanes. This gives them the choice whichever lane they would like to take. Either way, they all lead to a soft right bend, which follows into a meat freezer storage. |
||
| − | * The floor in the freezer is slippery, obviously. |
||
| − | * There are automatic sliding doors in front of the checklanes that may slide into your path. |
||
| + | Racers then traverse the freezer section, which consists of a very wide 180 degree turn, then leading to the exit of the storage. A sharp left bend follows into another hard right in quick succession. Racers than drive straight ahead to the checkout registers, which once again provide many lanes from their presence. The exit of the grocery store follows soon after, and players will drive on a straight-dipped sidewalk that lies just outside the market. At the end of the sidewalk, there is a right turn back into the entrance of the supermarket, completing the lap. |
||
| − | ==[[Global Pulse]] Location== |
||
| ⚫ | |||
| − | The [[Global Pulse]] is located right by the sliding doors, on the outside. In normal mode, go left out of the doors instead of right. In [[Reversed|reverse]] mode, you will see it as you drive along the path. Either way, you will lose some time attempting to get it. |
||
| + | The meat storage is by far the track's most infamous obstacle. As it is a cold freezer, the surface of the meat locker is very icy and slippery, diminishing the car's traction and causing any vehicle to slide when turning. [[RWD]] cars in particular are much more dire in this situation as the power from the rear of their wheels cause them to spin out. |
||
| + | Near the exit of the grocery store, there are two trolleys right after the checkouts. Their heavy weight will cause any unsuspecting players to lose almost all of their speed should one come into contact with one. The exit also is supported through automatic sliding doors, which moves in and out periodically, potentially sliding into the paths of unfortunate racers. |
||
| − | ==[[Practice]] Star Location== |
||
| − | The [[Practice]] mode star is located in the air above the middle register. Hit the ramp at full speed, and you should grab it. |
||
| + | Finally, the entrance of the market follows right immediately after the peak elevation of the sidewalk. Players must be cautious in this section or risk spinning out upon landing, which will make or break the race as it is the final turn of the track. |
||
| − | ==Tips== |
||
| + | |||
| − | * Reduce speed going into the freezer to avoid drifting very far. |
||
| + | ==Strategies== |
||
| − | * The frosted (white) edges of the floor in the freezer have more traction than the icy (gray) part. Aim for those to leave your opponents reeling on the ice. |
||
| + | As mentioned before, RWD configured vehicles such as [[Aquasonic]] have issues in the freezer sections, and due to this, they are not recommended for this course. [[FWD]] vehicles such as [[RC]] on the other hand, do much better as they have an emphasis on grip. |
||
| − | * A well placed [[Oil Slick]] or [[Clone Pick Up]] in or before the freezer is by far the cheapest and most evil tactic you can possibly pull off. That is, unless you activate an [[Electro Pulse]] while drifting by anyone who hit said [[Oil Slick]]. |
||
| + | |||
| − | * For more freezer fun, bring some [[Firework]]s or [[Water Balloon]]s with you. |
||
| + | While the freezer section is a challenging obstacle, there are some areas in which the surface is completely dry. They lie on the inside and outside perimeters of the meat locker. Vehicles can cut across to this section in particular the inside corner, saving time and navigating through the hazard with ease. Vehicles can alternatively slow down before undertaking the section for extra control. Furthermore, [[Oil Slick]]s or even any havoc in particular are also devious in this section, giving them no chance of recovery due to the friction-less surface. |
||
| − | * As cool as it may feel, don't jump off of the register ramps unless there is something obstructing the lane; you will lose time. |
||
| + | |||
| − | * Drop an [[Oil Slick]] or [[Clone Pick Up]] as close to the center of the sliding doors as you can. If the timing is right, other racers are forced to either drive through the trap, or run into a door. |
||
| + | Finally, players should also take the rightmost lane in both the aisles and checkout registers as these lanes are the closest to the following corner. Following the checkout registers, a [[Clone Pick Up]] or [[Ball Bearing]] are effective in the sidewalk as it is quite narrow and follows from a blind corner. |
||
| − | * A great place to drop a [[Ball Bearing]] or [[Clone Pick Up]] is in the dip on the front sidewalk; racers can't see down there usually until it's too late. |
||
| + | |||
| ⚫ | |||
| + | ==Star Locations== |
||
| + | <tabber>Global Pulse=[[Image:Market2gs.png|thumb|250px]] |
||
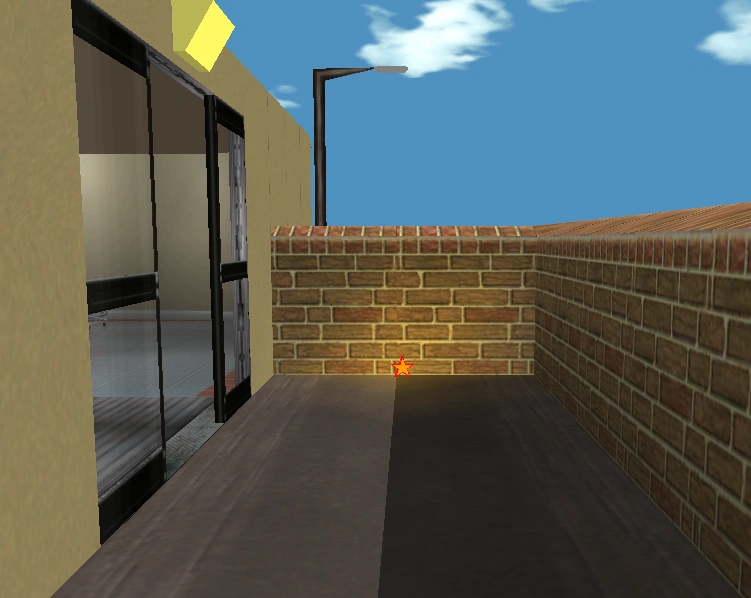
| + | The [[Global Pulse]] is located on the left end of the sidewalk which follows after the sliding doors.<br><br><br><br><br><br><br><br> |
||
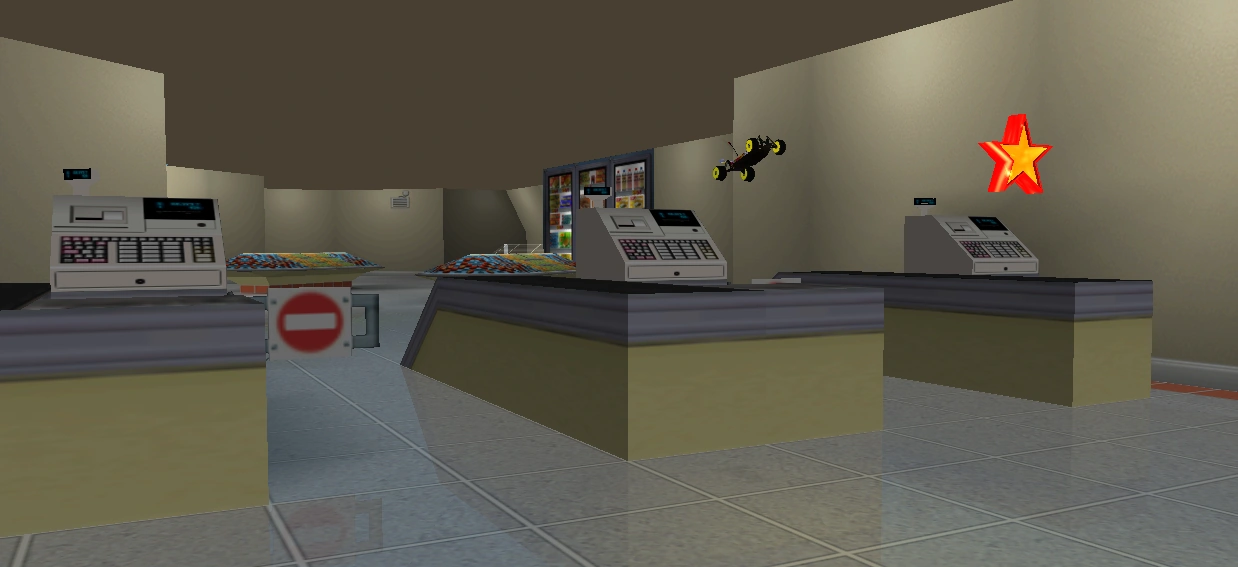
| + | |-|Practice Star=[[File:Market2ps.png|thumb|250px]]The [[Practice]] mode star is located in the air above the middle register. By hitting the ramp at a fast speed, the vehicle should fly right into the airborne star. A fast or high accelerating car, such as [[Col. Moss]] or [[Sprinter XL]] respectively, is recommended.<br><br> |
||
| + | </tabber> |
||
| + | ==Trivia== |
||
| + | * This track is labelled as SuperMarket 2 despite it appearing before [[SuperMarket 1]]. This inconsistency is shared with [[Museum 2]]. |
||
| + | * In [[Dev]] and [[Demo]] versions, SuperMarket 2 is set at [[Medium]] difficulty. |
||
| + | * The [[Re-Volt (PS1)|PlayStation version]], due to technical limitations, lacks the slippery property in the freezer section, thereby making the track much more easier. |
||
| + | |||
| + | ==Gallery== |
||
| + | <gallery hideaddbutton="true"> |
||
| + | market2.png|SuperMarket 2 gfx art. |
||
| + | Market2Startpos.png|The starting grid. |
||
| + | Market2Layout1.png|Exiting away from the aisle lanes. |
||
| + | Market2Layout2.png|Multiple cars lose control in the freezer section. |
||
| + | Market2Layout3.png|The two consecutive turns. |
||
| + | Market2Layout4.png|[[Mouse]] and others heading for the checkouts and exit. |
||
| + | Market2Layout5.png|RC cars exiting the market onto the sidewalk. |
||
| + | Gbc market1.png|GFX art for the discontinued [[GBC port]]]. |
||
| + | Gbc sgt market.png|[[Bertha Ballistics]] racing in the GBC version of the track. |
||
| + | </gallery> |
||
| + | |||
| + | ==See Also== |
||
| + | * [[SuperMarket 1]] |
||
| + | [[Category:Tracks]] |
||
| + | [[Category:Standard Tracks]] |
||
| ⚫ | |||
Revision as of 23:32, 21 April 2019
SuperMarket 2 is a standard track created by Acclaim Studios. It is the second track in the Bronze Cup Championship. It sets the racers in a small grocery store. In the middle of the track lies the storage freezer, which is the track's most distinctive feature.
Course Layout
Racers start at the entrance of the supermarket. Ahead of them lies three aisles, which open up four lanes. This gives them the choice whichever lane they would like to take. Either way, they all lead to a soft right bend, which follows into a meat freezer storage.
Racers then traverse the freezer section, which consists of a very wide 180 degree turn, then leading to the exit of the storage. A sharp left bend follows into another hard right in quick succession. Racers than drive straight ahead to the checkout registers, which once again provide many lanes from their presence. The exit of the grocery store follows soon after, and players will drive on a straight-dipped sidewalk that lies just outside the market. At the end of the sidewalk, there is a right turn back into the entrance of the supermarket, completing the lap.
Hazards/Obstacles
The meat storage is by far the track's most infamous obstacle. As it is a cold freezer, the surface of the meat locker is very icy and slippery, diminishing the car's traction and causing any vehicle to slide when turning. RWD cars in particular are much more dire in this situation as the power from the rear of their wheels cause them to spin out.
Near the exit of the grocery store, there are two trolleys right after the checkouts. Their heavy weight will cause any unsuspecting players to lose almost all of their speed should one come into contact with one. The exit also is supported through automatic sliding doors, which moves in and out periodically, potentially sliding into the paths of unfortunate racers.
Finally, the entrance of the market follows right immediately after the peak elevation of the sidewalk. Players must be cautious in this section or risk spinning out upon landing, which will make or break the race as it is the final turn of the track.
Strategies
As mentioned before, RWD configured vehicles such as Aquasonic have issues in the freezer sections, and due to this, they are not recommended for this course. FWD vehicles such as RC on the other hand, do much better as they have an emphasis on grip.
While the freezer section is a challenging obstacle, there are some areas in which the surface is completely dry. They lie on the inside and outside perimeters of the meat locker. Vehicles can cut across to this section in particular the inside corner, saving time and navigating through the hazard with ease. Vehicles can alternatively slow down before undertaking the section for extra control. Furthermore, Oil Slicks or even any havoc in particular are also devious in this section, giving them no chance of recovery due to the friction-less surface.
Finally, players should also take the rightmost lane in both the aisles and checkout registers as these lanes are the closest to the following corner. Following the checkout registers, a Clone Pick Up or Ball Bearing are effective in the sidewalk as it is quite narrow and follows from a blind corner.
Star Locations
Trivia
- This track is labelled as SuperMarket 2 despite it appearing before SuperMarket 1. This inconsistency is shared with Museum 2.
- In Dev and Demo versions, SuperMarket 2 is set at Medium difficulty.
- The PlayStation version, due to technical limitations, lacks the slippery property in the freezer section, thereby making the track much more easier.
Gallery
")
")
")
")
")
")
")
![GFX art for the discontinued GBC port].](/wiki/File:Gbc_market1.png "Gbc market1.png (73 KB)")
")